 PostgreSQL: Getting started
How to get started with PostgreSQL
👋 Welcome to the Stackhero documentation!
Stackhero offers a ready-to-use PostgreSQL cloud solution that provides a host of benefits, including:
- Unlimited connections and data transfers.
- PgAdmin web UI included.
- Many modules included like
PostGIS,TimescaleDBandPgVector.- Effortless updates with just a click.
- Optimal performance and robust security powered by a private and dedicated VM.
Save time and simplify your life: it only takes 5 minutes to try Stackhero's PostgreSQL cloud hosting solution!
Using the PostgreSQL psql CLI
You can manage PostgreSQL with its official psql CLI. It is available for installation on your computer, allowing you to manage your PostgreSQL service remotely. Alternatively, you can run it via Docker. This method is often preferred because it avoids installing psql directly on your computer and makes it easier to switch between versions.
To access psql using Docker, run the following command (make sure to replace 18 with the major version number of your PostgreSQL service):
docker run -v $(pwd):/mnt -it postgres:18-alpine /bin/bash
Then connect to your PostgreSQL service using:
cd /mnt
psql \
  --host=<XXXXXX>.stackhero-network.com \
  --username=admin \
  --port=<PORT> \
  --dbname=admin
Creating a user and database in PostgreSQL
By default, an admin user is created with administrative rights. It is a good practice to create a dedicated user and database for each project you plan to host.
Using PgAdmin web UI
To use the PgAdmin web UI, open your PostgreSQL domain with HTTPS (for example, https://<XXXXXX>.stackhero-network.com). Log in with admin as the username and the password that you set in your service configuration (visible in your Stackhero dashboard).
Creating a user
-
Go to
Servers/PostgreSQL, right-click onLogin/Group Roles, and selectCreate/Login/Group Role: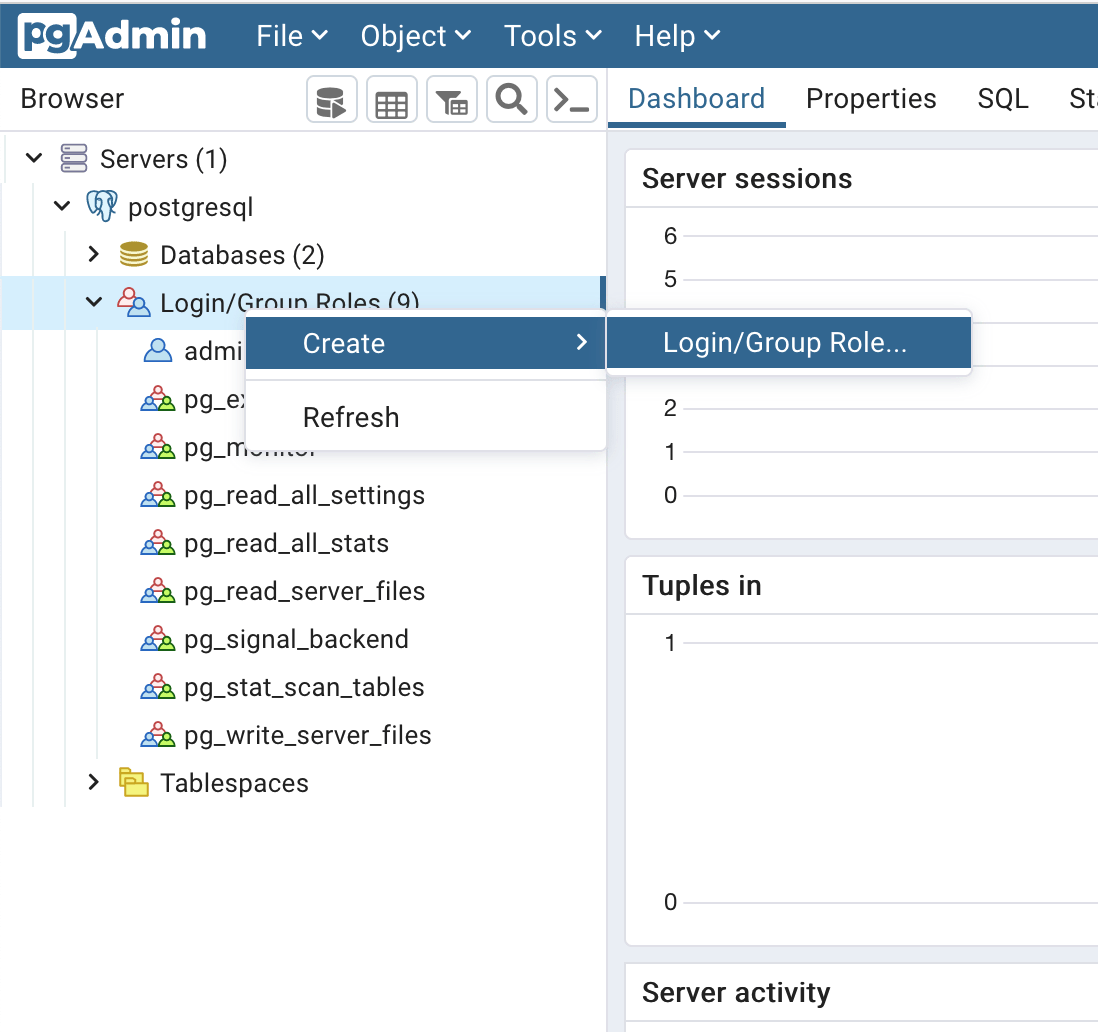 Create a user in PostgreSQL using PgAdmin
 -
Set the login name:
 Define user login
 -
Set a secure password to avoid brute force attacks:
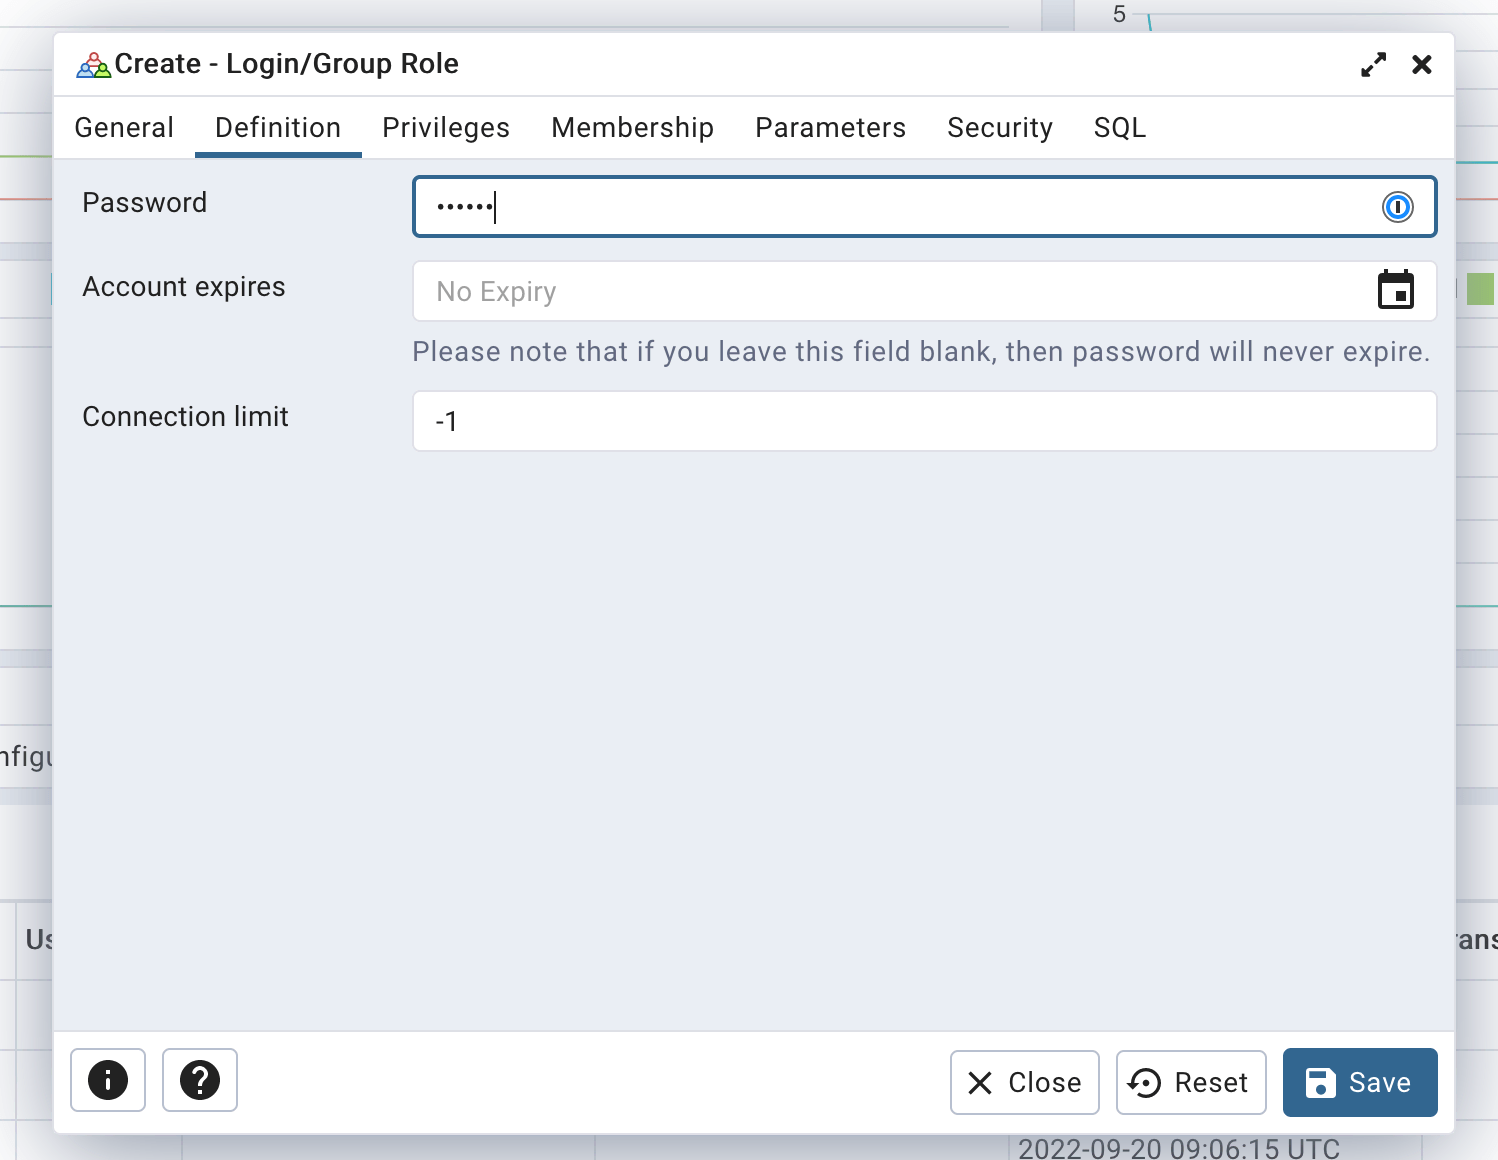 Define user password
 -
Finally, ensure that only the "Can login" privilege is selected:
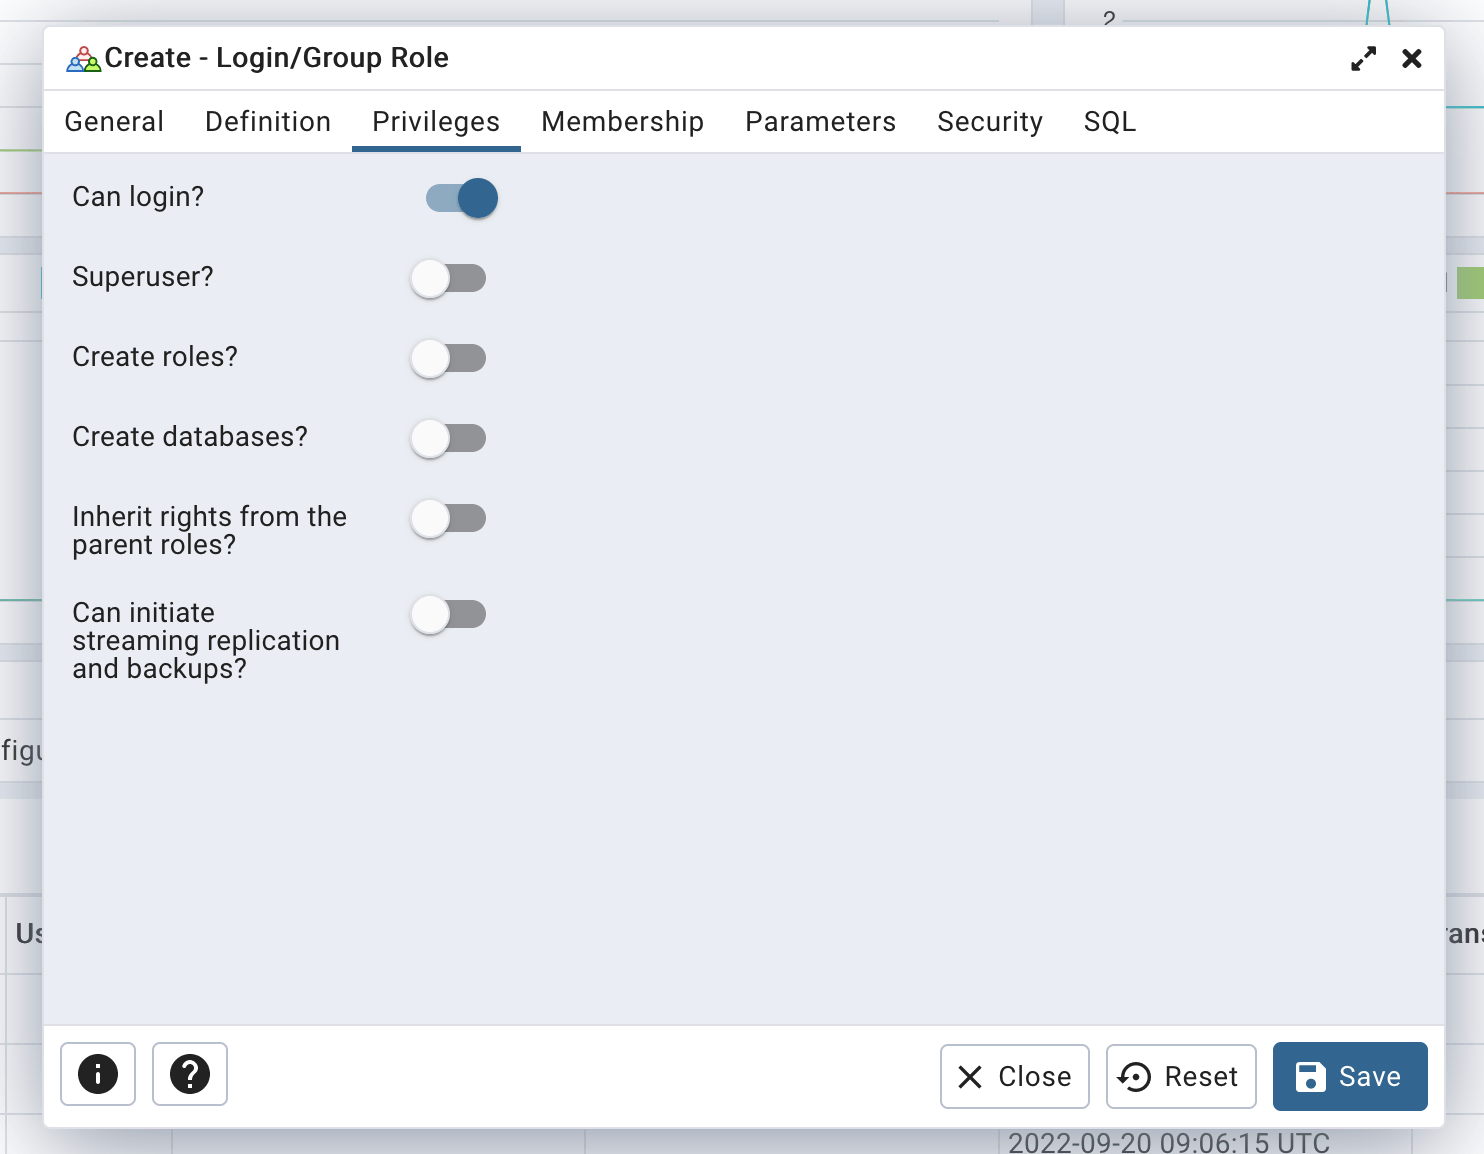 Define user rights
Click the "Save" button to create your user.
Creating a database
-
Go to
Servers/postgresql, right-click onDatabases, and selectCreate/Database...: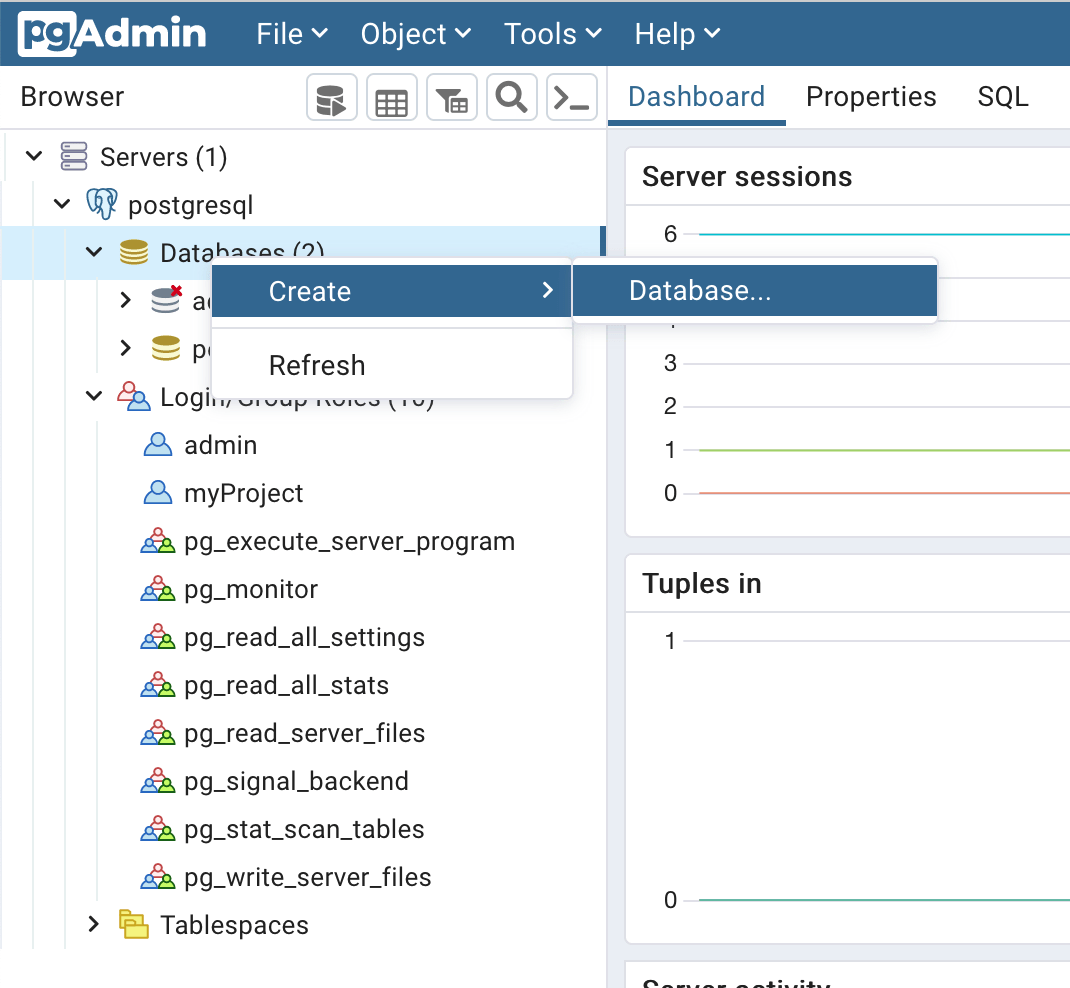 Create a database using PgAdmin
A good practice is to use the same name for both the database and the user. For example, if your project is named "superWebsite," consider creating a user named "superWebsite" and a database named "superWebsite".
-
Set the database name and choose the owner (the user you just created):
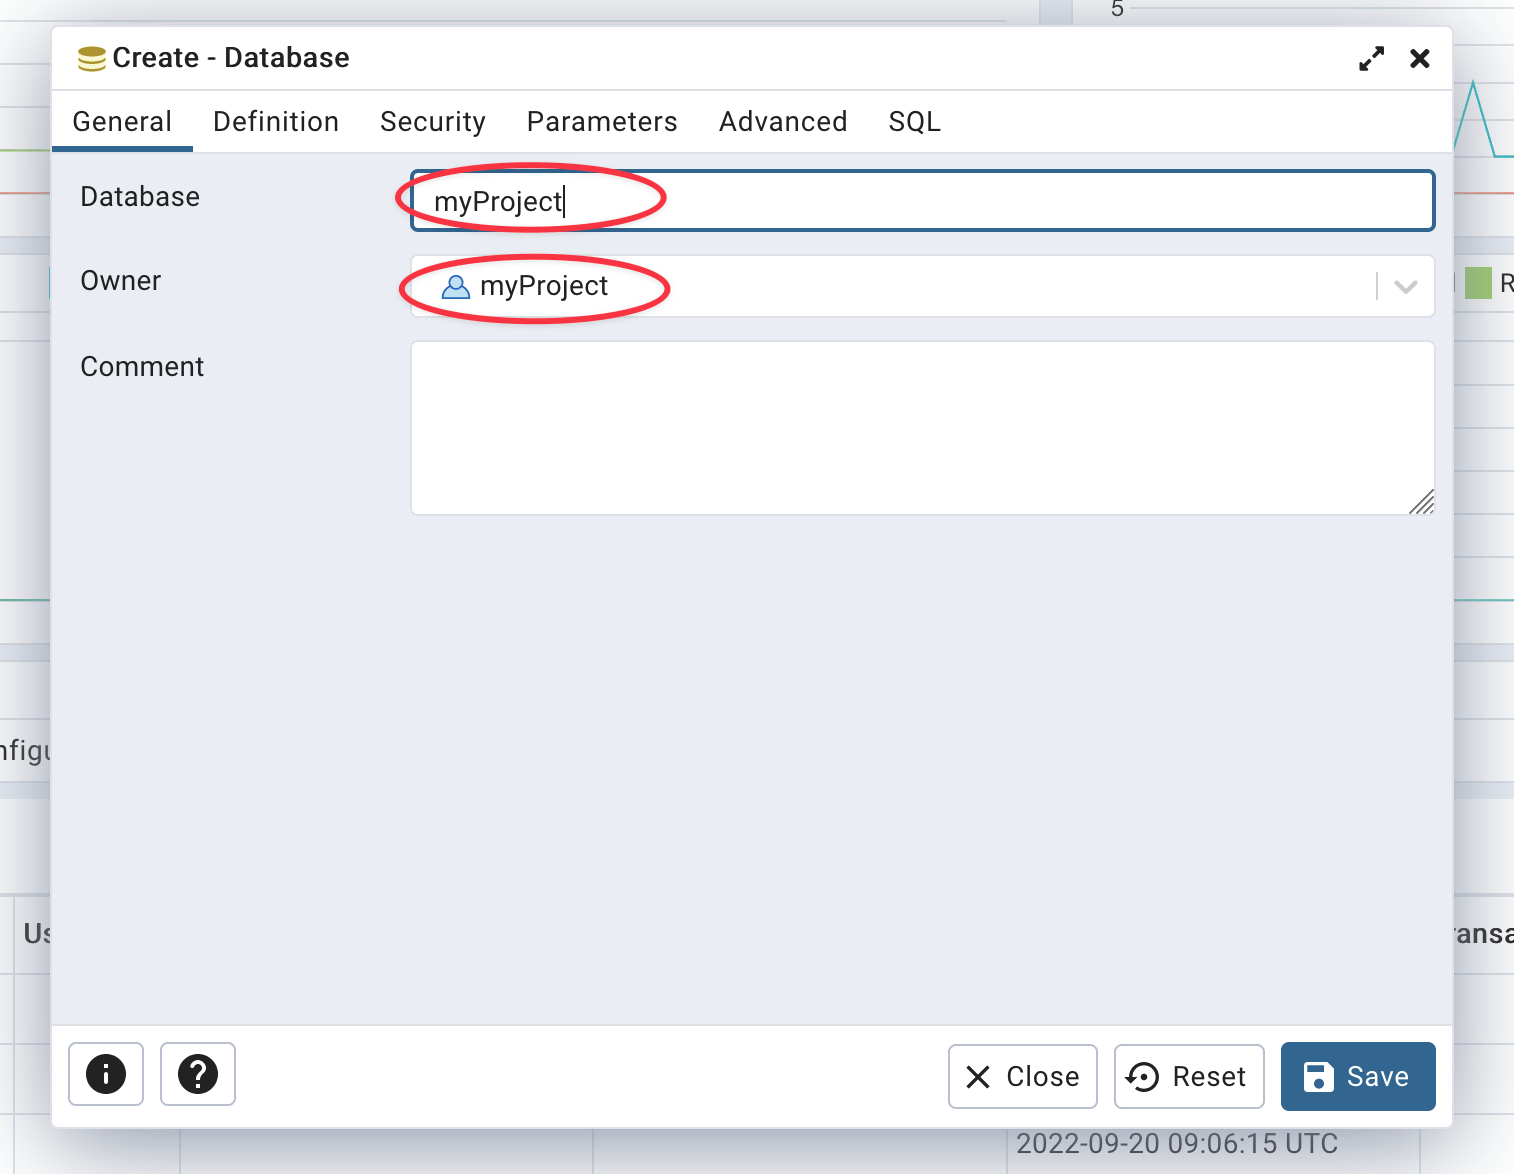 Defined database name and owner
Your database is now created.
Using the psql CLI
Creating a user
To create a user on PostgreSQL using the psql CLI, run the following SQL query:
CREATE ROLE "myProject" WITH
  LOGIN
  NOSUPERUSER
  NOCREATEDB
  NOCREATEROLE
  NOINHERIT
  NOREPLICATION
  CONNECTION LIMIT -1
  PASSWORD 'secretPassword';
Don't forget to replace
myProjectwith your project name andsecretPasswordwith a secure password. Also, it is a good practice to use your project name as both the login and database name. If your project name is "superWebsite," consider creating a user named "superWebsite" and a database named "superWebsite".You can generate a secure password with this command line:
openssl rand -base64 24 | tr -d '\n' | cut -c1-32
Creating a database
To create a database on PostgreSQL using the psql CLI, run the following SQL query:
CREATE DATABASE "myProject"
  WITH
  OWNER = "myProject"
  ENCODING = 'UTF8'
  CONNECTION LIMIT = -1
  IS_TEMPLATE = false;
A good practice is to use the same name for both the database and the user. For example, if your project name is "superWebsite," consider creating a user named "superWebsite" and a database named "superWebsite".
Importing data from your computer to PostgreSQL
One of the simplest ways to import data from your computer to your PostgreSQL instance is to use the PostgreSQL CLI. On your computer, run the following command (replace <DB_NAME> with your database name and data.pgsql with the name of your SQL file):
psql \
  --host=<XXXXXX>.stackhero-network.com \
  --username=admin \
  --port=<PORT> \
  --dbname=<DB_NAME> \
  < data.pgsql
Exporting data from PostgreSQL to your computer
Exporting data from your PostgreSQL instance to your computer is just as straightforward using the PostgreSQL CLI.
-
To export the entire database (replace
<DB_NAME>with your database name):pg_dump \ --host=<XXXXXX>.stackhero-network.com \ --username=admin \ --port=<PORT> \ --dbname=<DB_NAME> \ > data.pgsql -
To export a single table (replace
<DB_NAME>with your database name and<TABLE_NAME>with your table name):pg_dump \ --host=<XXXXXX>.stackhero-network.com \ --username=admin \ --port=<PORT> \ --dbname=<DB_NAME> \ --table=<TABLE_NAME> \ > data.pgsql
Using PostgreSQL with Node.js
To connect PostgreSQL using Node.js and the pg package (also known as node-postgres), you can consider the following example. Note the ssl argument, which is important for ensuring TLS encryption:
const { Client } = require('pg');

(async () => {
  const pg = new Client({
    host: '<XXXXXX>.stackhero-network.com',
    port: <PORT>,
    user: '<USERNAME>',
    password: '<PASSWORD>',
    database: '<DATABASE>',
    ssl: {}
  });

  await pg.connect();

  const result = await pg.query('SELECT 1');

  await pg.end();
})().catch(error => {
  console.error('');
  console.error('🐞 An error occurred!');
  console.error(error);
  process.exit(1);
});
A complete example using PostgreSQL with Node.js and the pg library (and async/await) is available on this Git repository:
https://github.com/stackhero-io/postgresqlGettingStarted.
Using PostgreSQL with Node.js/TypeORM
To connect to PostgreSQL from Node.js using TypeORM, set the ssl flag to true as shown in the example below:
createConnection({
  type: 'postgres',
  host: '<XXXXXX>.stackhero-network.com',
  port: <PORT>,
  username: '<USERNAME>',
  password: '<PASSWORD>',
  database: '<DATABASE>',
  extra: {
    ssl: true
  }
});
Using PostgreSQL with Django
If it is not already installed, install the psycopg module, which will be used to connect to PostgreSQL:
pip install psycopg
In this initial step, you will store the password directly in the settings.py file. This method is only for testing because it is not secure. Later in this documentation, you will find an example of best practice.
Open the settings.py file and add the following configuration:
DATABASES = {
  'default': {
    'ENGINE': 'django.db.backends.postgresql',
    'HOST': '<XXXXXX>.stackhero-network.com',
    'PORT': <PORT>,
    'OPTIONS': {
      'sslmode': 'require',
    },
    'NAME': 'admin',
    'USER': 'admin',
    'PASSWORD': '<ADMIN_PASSWORD>'
  }
}
Be careful: this example is not recommended for production and is intended for testing purposes only!
Once your connection works, you can adopt a more secure method to store credentials. The following example uses django-environ and stores credentials in a .env file.
-
Install
django-environ:pip install django-environ -
Open the
settings.pyfile and modify it as follows:import environ env = environ.Env() environ.Env.read_env() DATABASES = { 'default': { 'ENGINE': 'django.db.backends.postgresql', 'HOST': env('STACKHERO_POSTGRESQL_HOST'), 'PORT': <PORT>, 'OPTIONS': { 'sslmode': 'require', }, 'NAME': 'admin', 'USER': 'admin', 'PASSWORD': env('STACKHERO_POSTGRESQL_ADMIN_PASSWORD') } } -
Open or create the
.envfile in the same directory assettings.pyand add:STACKHERO_POSTGRESQL_HOST=<XXXXXX>.stackhero-network.com STACKHERO_POSTGRESQL_ADMIN_PASSWORD=<ADMIN_PASSWORD> -
Finally, add
.envto your.gitignorefile to ensure your credentials are not stored in your Git repository:
echo ".env" >> .gitignore
Activating PostgreSQL PostGIS extension
The PostGIS extension is included with our PostgreSQL service. You must activate it on each database where you plan to use it.
To activate the extension, connect to your database and execute this query:
CREATE EXTENSION postgis;
You can verify that PostGIS is working by checking its version:
SELECT PostGIS_Full_Version();
Alternatively, retrieve a list of all installed PostGIS extensions:
SELECT * FROM pg_extension WHERE extname LIKE 'postgis%';
If necessary, you may add other extensions. However, it is strongly recommended that you do not activate extensions that you will not use:
-- Enable PostGIS
CREATE EXTENSION postgis;

-- Enable raster support
CREATE EXTENSION postgis_raster;

-- Enable Topology
CREATE EXTENSION postgis_topology;

-- Fuzzy matching needed for Tiger
CREATE EXTENSION fuzzystrmatch;

-- Rule based standardizer
CREATE EXTENSION address_standardizer;

-- Example rule data set
CREATE EXTENSION address_standardizer_data_us;

-- Enable US Tiger Geocoder
CREATE EXTENSION postgis_tiger_geocoder;
Caution: do not activate PostGIS on the database
postgres!
Deactivating PostgreSQL PostGIS extension
To remove PostGIS from a database, connect to the relevant database and run the following query:
DROP EXTENSION postgis;
Activating PgVector extension
Activating the PgVector extension on Stackhero is simple. Run the following query:
CREATE EXTENSION vector;
Activating TimescaleDB extension
Activating the TimescaleDB extension on Stackhero is simple. Run the following query:
CREATE EXTENSION timescaledb;
Tracking statistics of SQL planning and execution (pg_stat_statements)
To enable support for pg_stat_statements, first enable it in your PostgreSQL configuration via the Stackhero dashboard. Then, enable the extension for your current database by running:
CREATE EXTENSION pg_stat_statements;
For more information, please refer to the PostgreSQL official documentation.
Configuring PostgreSQL with Skyvia
Using Skyvia with Stackhero for PostgreSQL is straightforward. Ensure a secure connection by configuring the following settings:
- Set
ProtocoltoSSL - Set
Portto your PostgreSQL port - Force encryption by setting
SSL ModetoRequire - Select an
SSL TLS Protocolof1.2or higher
For additional details on Skyvia configuration, please refer to the Skyvia official documentation.
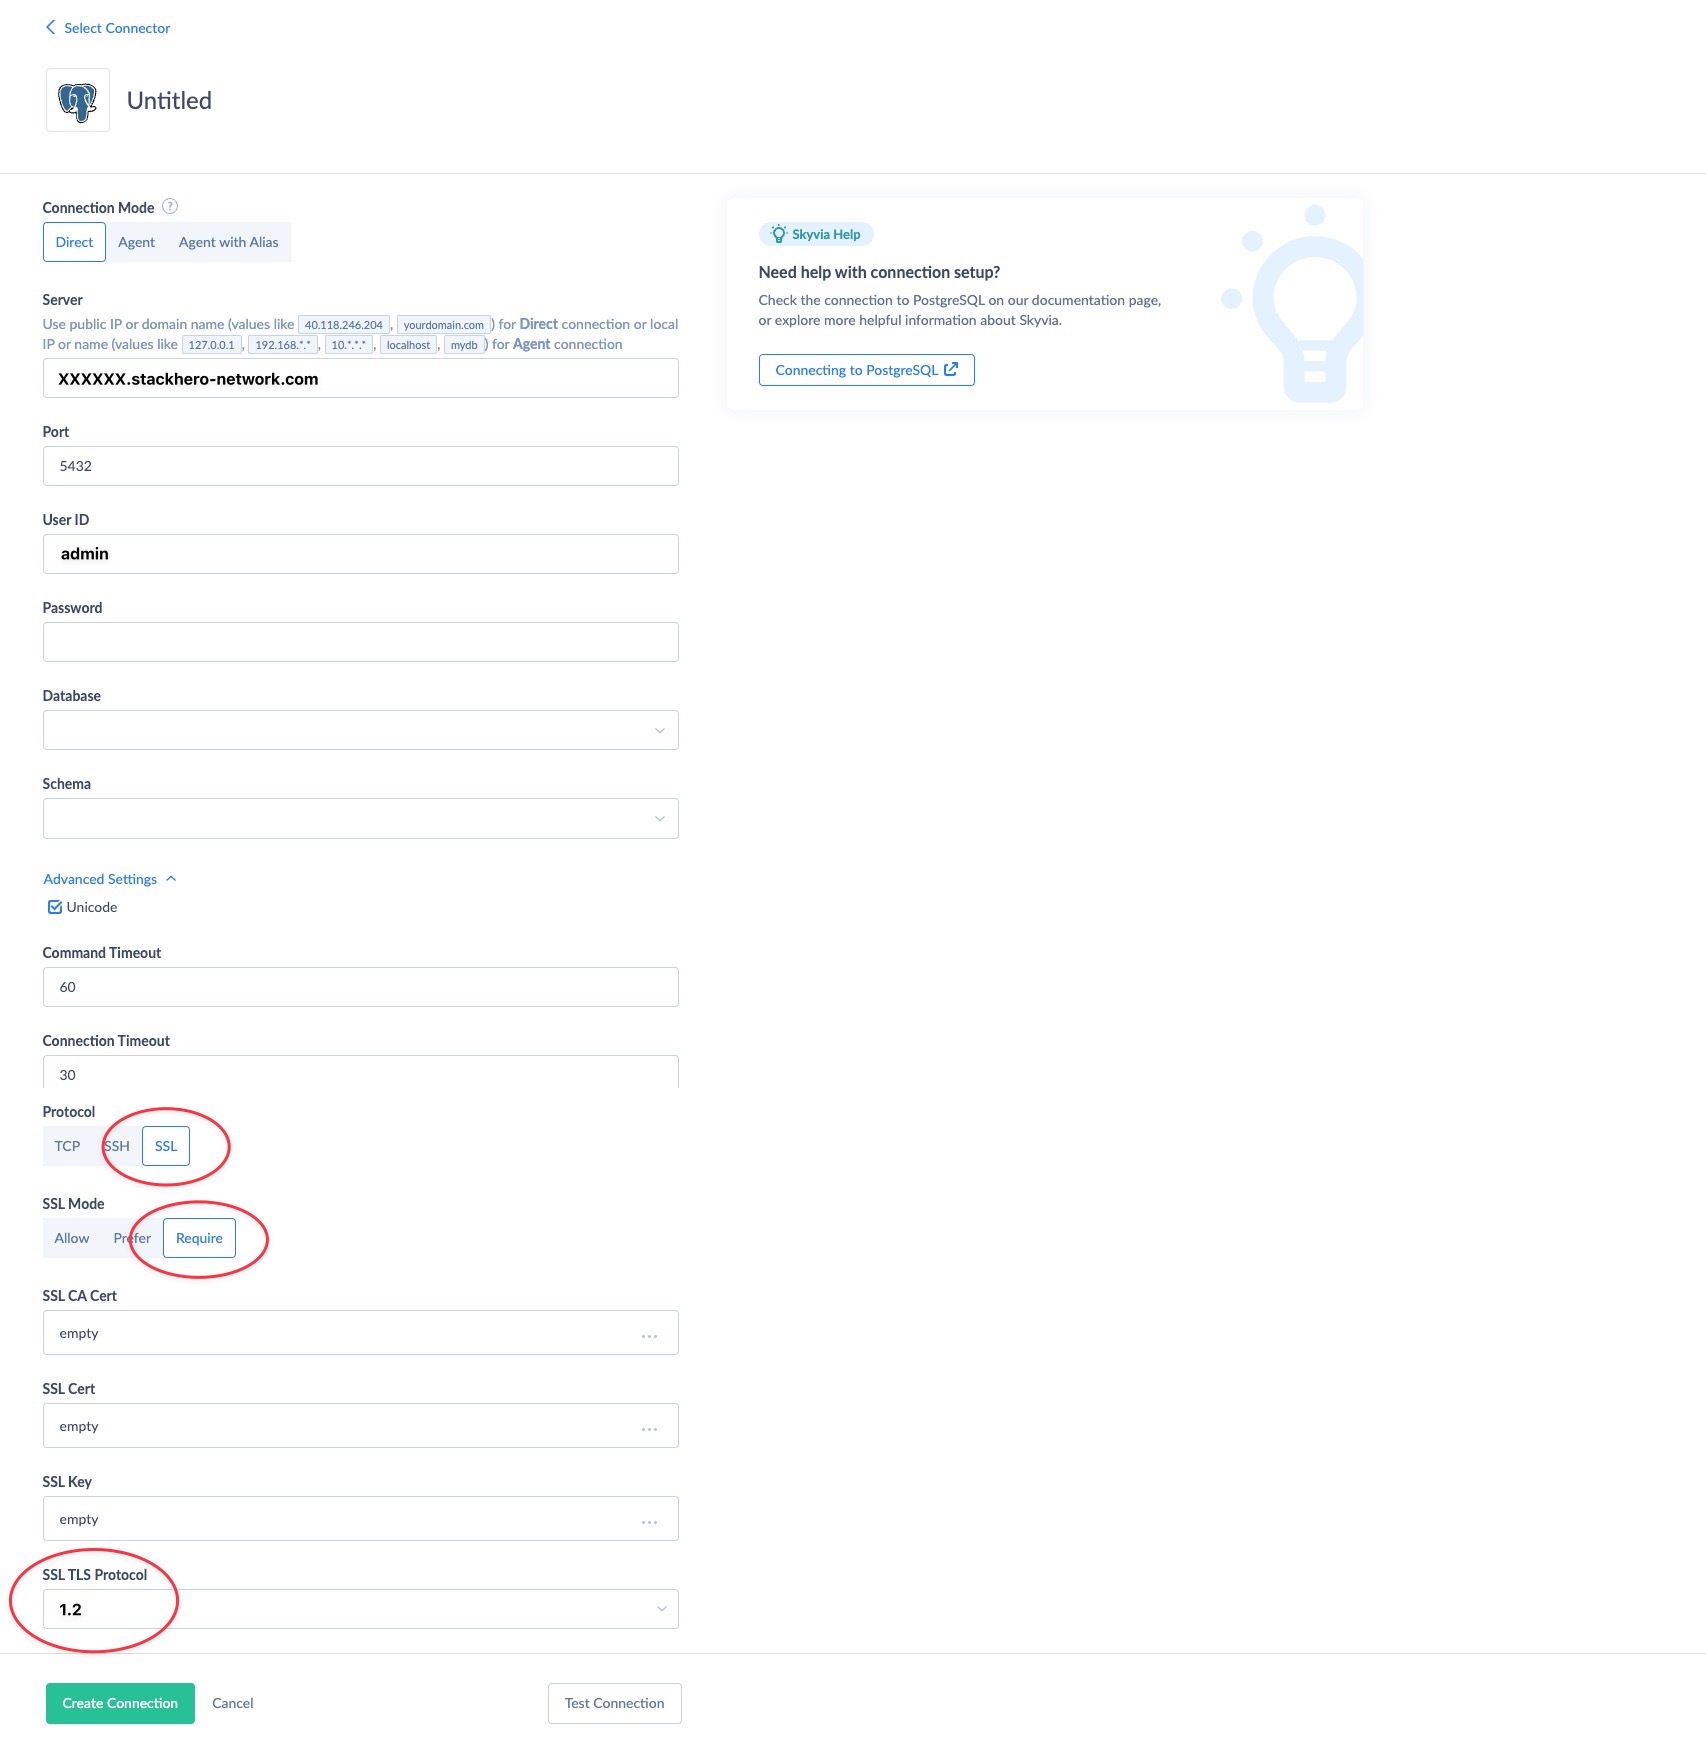 Example of Skyvia configuration with Stackhero for PostgreSQL