 RabbitMQ: Getting Started
How to use Stackhero for RabbitMQ
👋 Welcome to the Stackhero documentation!
Stackhero offers a ready-to-use RabbitMQ cloud solution that provides a host of benefits, including:
- Full access to the RabbitMQ web UI for managing users, vhosts, and permissions.
- Unlimited queues with no retention time limitations.
- Supports protocols AMQP, MQTT, STOMP, and WebSocket.
- Many plugins included, such as
Delayed Message Exchange,Message DeduplicationandConsistent-hash Exchange.- Effortless updates with just a click.
- Optimal performance and robust security powered by a private and dedicated VM.
Save time and simplify your life: it only takes 5 minutes to try Stackhero's RabbitMQ cloud hosting solution!
Using Python to connect to RabbitMQ
This example shows how to use the Aio Pika library to connect Python to RabbitMQ. In many cases, specifying the AMQPS URL is all that is needed:
connection = await aio_pika.connect_robust(
  "amqps://admin:<PASSWORD>@<XXXXXX>.stackhero-network.com:<AMQP_PORT_TLS>",
)
Below is a complete Python example that establishes a secure connection to RabbitMQ. You can follow these steps to verify your connection and set up a basic queue:
import asyncio
import logging
import aio_pika

async def main() -> None:
    # Uncomment the following line to enable debug logs
    # logging.basicConfig(level=logging.DEBUG)

    connection = await aio_pika.connect_robust(
        "amqps://admin:<PASSWORD>@<XXXXXX>.stackhero-network.com:<AMQP_PORT_TLS>"
    )

    async with connection:
        print("The connection worked!")
        channel = await connection.channel()
        await channel.set_qos(prefetch_count=10)
        queue = await channel.declare_queue("test_queue", auto_delete=True)

if __name__ == "__main__":
    asyncio.run(main())
Handling error unable to get local issuer certificate
If you see the error
aiormq.exceptions.AMQPConnectionError: [Errno 5] [SSL: CERTIFICATE_VERIFY_FAILED] certificate verify failed: unable to get local issuer certificate (_ssl.c:1006)
when connecting to RabbitMQ from Python, it usually indicates that your system is missing the Let's Encrypt certificate. To resolve this, install the common CA certificates:
-
On Ubuntu/Debian, run:
sudo apt install ca-certificates -
On Alpine Linux, run:
apk add ca-certificates
If you are unable to use these commands, you can install the CA certificate manually:
-
Download the Let's Encrypt CA certificate from https://letsencrypt.org/certs/isrgrootx1.pem.
-
Then, connect to RabbitMQ in your Python code by passing the CA certificate file:
import ssl

ssl_context = ssl.create_default_context()
ssl_context.load_verify_locations(cafile='isrgrootx1.pem')

connection = await aio_pika.connect_robust(
  "amqps://admin:<PASSWORD>@<XXXXXX>.stackhero-network.com:<AMQP_PORT_TLS>",
  ssl_context=ssl_context
)
Below is a complete Python example that uses the Let's Encrypt CA certificate to establish a secure connection:
import asyncio
import logging
import ssl
import aio_pika

async def main() -> None:
    # Uncomment the following line to enable debug logs
    # logging.basicConfig(level=logging.DEBUG)

    ssl_context = ssl.create_default_context()
    # Manually load the Let's Encrypt CA certificate
    # Download it using: wget https://letsencrypt.org/certs/isrgrootx1.pem
    ssl_context.load_verify_locations(cafile='isrgrootx1.pem')

    connection = await aio_pika.connect_robust(
        "amqps://admin:<PASSWORD>@<XXXXXX>.stackhero-network.com:<AMQP_PORT_TLS>",
        ssl_context=ssl_context
    )

    async with connection:
        print("The connection worked!")
        channel = await connection.channel()
        await channel.set_qos(prefetch_count=10)
        queue = await channel.declare_queue("test_queue", auto_delete=True)


if __name__ == "__main__":
    asyncio.run(main())
Using GoLang to connect to RabbitMQ
Below is a simple example that shows how to connect to RabbitMQ from a GoLang application using the official Go RabbitMQ Client Library. Follow these steps to set up your project:
- Create a new directory and initialize the module:
go mod init rabbitmq-example
- Add the RabbitMQ library:
go get github.com/rabbitmq/amqp091-go
-
Create a new file named
main.goand add the following content:package main import ( "fmt" amqp "github.com/rabbitmq/amqp091-go" ) func main() { connection, err := amqp.Dial("amqps://<PASSWORD>@<XXXXXX>.stackhero-network.com:<AMQP_PORT_TLS>") if err != nil { panic(err) } defer connection.Close() fmt.Println("Successfully connected to RabbitMQ instance") } -
Run your code:
go run main.go
You should see "Successfully connected to RabbitMQ instance", which indicates that your code has connected securely using authentication and TLS encryption.
For more examples, you can explore Go examples on the official RabbitMQ repository: https://github.com/rabbitmq/rabbitmq-tutorials/tree/main/go.
Using PHP to connect to RabbitMQ
Below is an example that demonstrates how to connect to RabbitMQ from PHP using the php-amqplib library. Since Stackhero instances use TLS encryption (SSL), the connection must be established with AMQPSSLConnection:
use PhpAmqpLib\Connection\AMQPSSLConnection;

$connection = new AMQPSSLConnection(
  '<XXXXXX>.stackhero-network.com',
  <AMQP_PORT_TLS>,
  'admin',
  '<PASSWORD>',
  '/',
  array()
);

/**
 * @param \PhpAmqpLib\Connection\AbstractConnection $connection
 */
function shutdown($connection)
{
  $connection->close();
}

register_shutdown_function('shutdown', $connection);
Manually download the CA certificate
The TLS connection might require a Certificate Authority (CA) certificate. Although many servers already have this installed, you might need to download it manually. Follow these steps:
- Download the certificate from https://letsencrypt.org/certs/isrgrootx1.pem and save it on your server.
- Use the following PHP code to connect using the downloaded certificate:
$sslOptions = array(
  'cafile' => realpath(__DIR__ . '/isrgrootx1.pem'),
);

$connection = new AMQPSSLConnection(
  '<XXXXXX>.stackhero-network.com',
  <AMQP_PORT_TLS>,
  'admin',
  '<PASSWORD>',
  '/',
  $sslOptions
);
Using PHP/Symfony to connect to RabbitMQ
Symfony can use RabbitMQ as a message broker by setting the MESSENGER_TRANSPORT_DSN environment variable. To configure this, edit the .env file and set the variable as follows:
MESSENGER_TRANSPORT_DSN=amqps://<USER>:<PASSWORD>@<HOST>:<PORT>/%2f/messages?cacert=%2Fetc%2Fssl%2Fcerts%2Fca-certificates.crt
Replace
<USER>,<PASSWORD>,<HOST>and<PORT>with your RabbitMQ details.
Also, ensure that the file config/packages/messenger.yaml uses the MESSENGER_TRANSPORT_DSN variable. The configuration should look like this:
framework:
    messenger:
        transports:
            async: '%env(MESSENGER_TRANSPORT_DSN)%'
Using Spring Boot to connect to RabbitMQ
Below is an example of how you can configure Spring Boot to connect securely to a Stackhero RabbitMQ instance. Update your application properties with these settings:
spring.rabbitmq.host=<XXXXXX>.stackhero-network.com
spring.rabbitmq.port=<AMQP_PORT_TLS>
spring.rabbitmq.username=admin
spring.rabbitmq.password=<PASSWORD>
spring.rabbitmq.ssl.enabled=true
spring.rabbitmq.ssl.algorithm=TLSv1.2
Using .NET and MassTransit to connect to RabbitMQ
Here is a sample showing how to connect to Stackhero RabbitMQ using .NET and MassTransit. This example configures the host with the necessary settings for TLS encryption:
using MassTransit;
using Microsoft.Extensions.DependencyInjection;
using Microsoft.Extensions.Hosting;
using System;

public class Program
{
  public static void Main(string[] args)
  {
    var host = Host.CreateDefaultBuilder(args)
      .ConfigureServices((context, services) =>
      {
        services.AddMassTransit(x =>
        {
          x.UsingRabbitMq((context, cfg) =>
          {
            cfg.Host(new Uri("amqps://admin:<PASSWORD>@<XXXXXX>.stackhero-network.com:<AMQP_PORT_TLS>"), h =>
            {
              h.UseSsl(s =>
              {
                s.Protocol = System.Security.Authentication.SslProtocols.Tls12;
              });
            });
          });
        });

        services.AddMassTransitHostedService(true);
      })
      .Build();

    host.Run();
  }
}
Delayed messages
With the "Delayed messages" plugin, you can delay or schedule messages by setting a delay in milliseconds. The plugin can be activated directly from the Stackhero dashboard. After activating the plugin, create a delayed exchange either via the RabbitMQ admin panel or directly in your code.
For more details, refer to the official repository: https://github.com/rabbitmq/rabbitmq-delayed-message-exchange.
If you disable the plugin, any delayed messages that have not yet been delivered will be lost.
Creating a delayed exchange via the RabbitMQ admin panel
After activating the plugin on the Stackhero dashboard, navigate to your RabbitMQ admin panel and create an exchange with the type "x-delayed-message". Then add an argument with the key x-delayed-type and the value "direct". This setup is illustrated in the screenshot below.
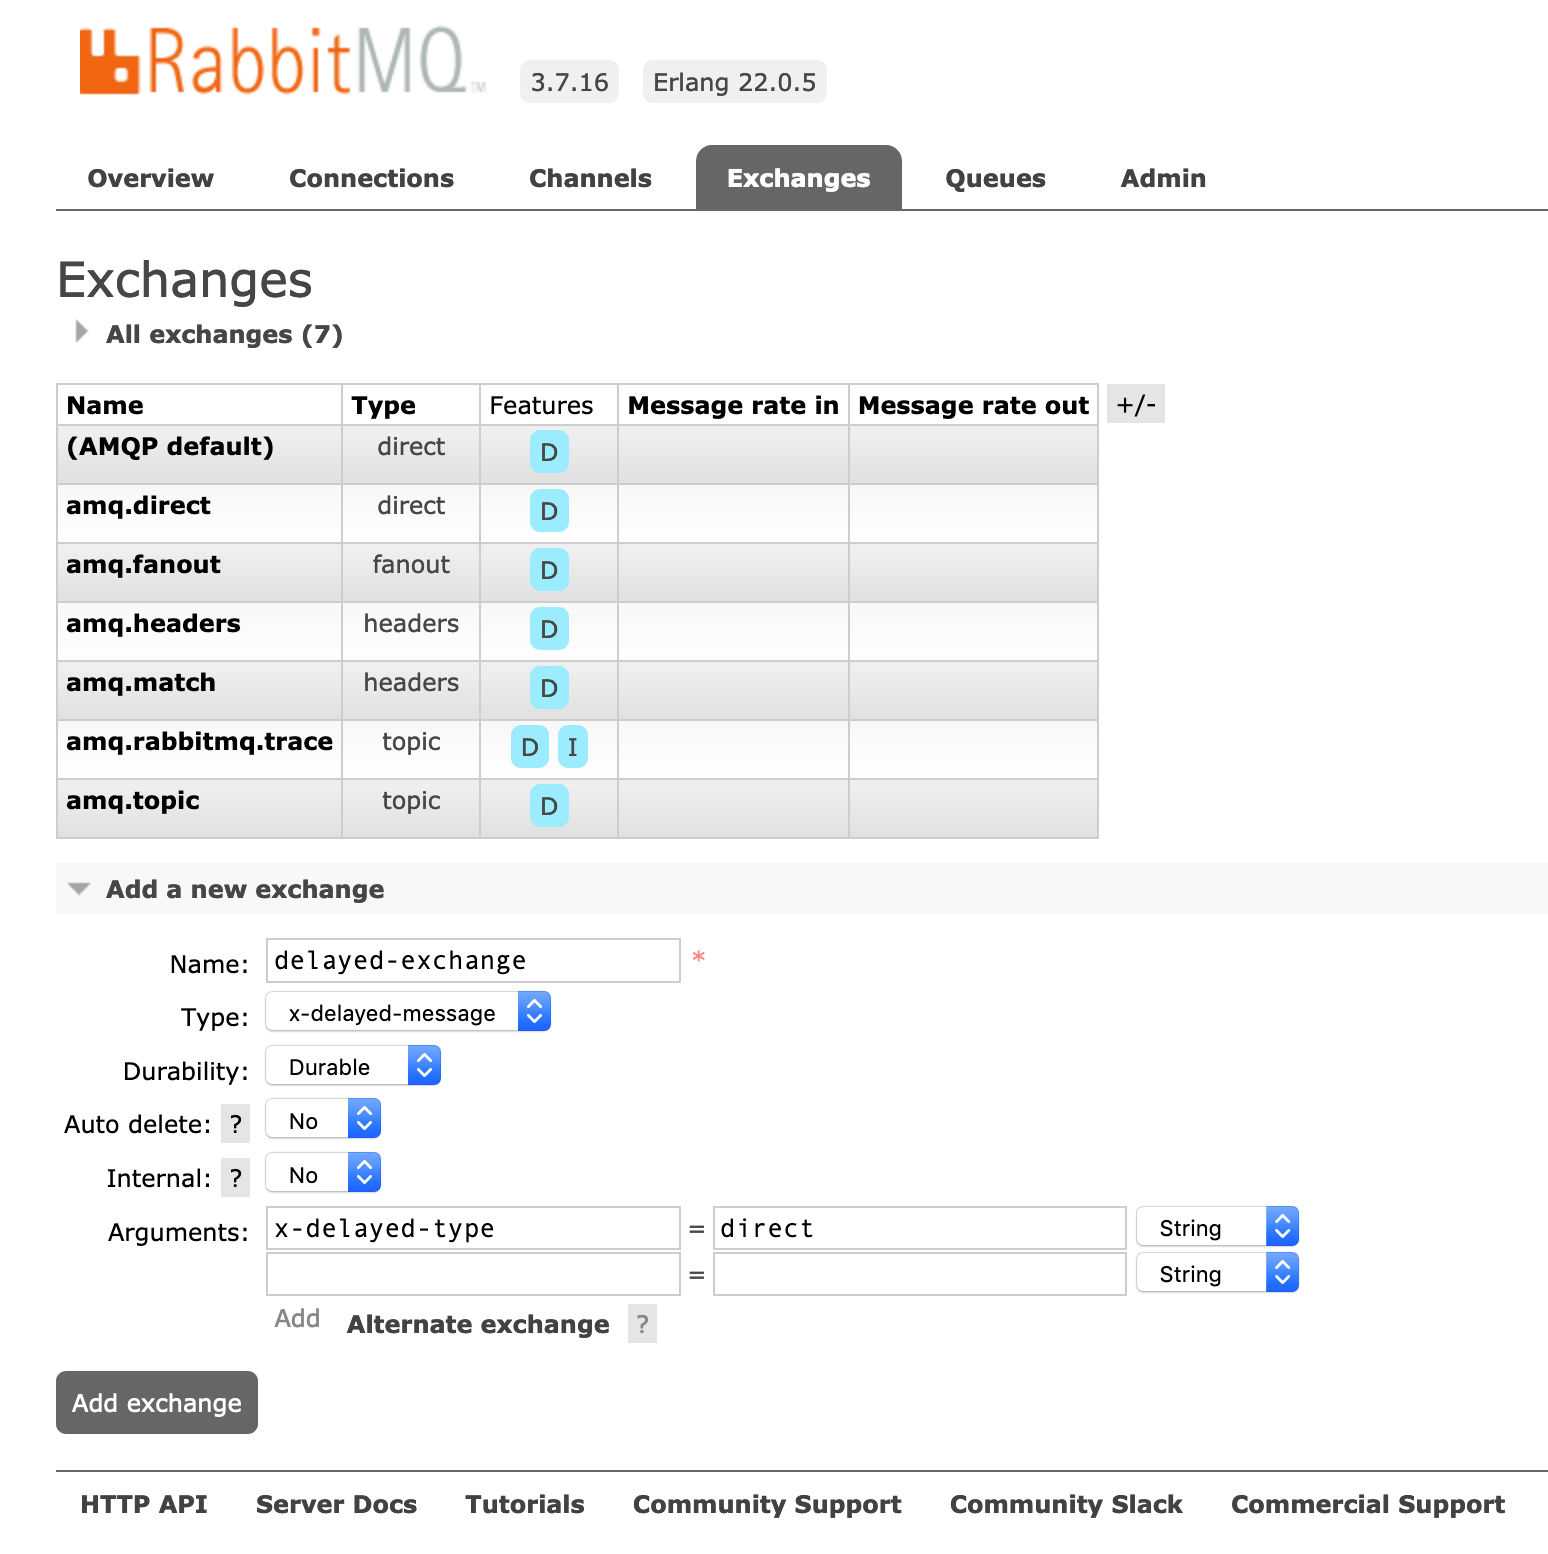 Exchange creation
If you encounter the error "Invalid argument, 'x-delayed-type' must be an existing exchange type", make sure that you have set the x-delayed-type argument correctly.
Handle error CLIENT ALERT: Fatal - Handshake Failure with Elixir
When using Elixir to connect to RabbitMQ, you might encounter the error
CLIENT ALERT: Fatal - Handshake Failure
This issue is related to a bug with TLS 1.3 support in the AMQP library for Elixir. A practical solution is to force the use of TLS 1.2. You can achieve this by including the following option when opening the connection:
AMQP.Connection.open("amqps://admin:<PASSWORD>@<XXXXXX>.stackhero-network.com:<AMQP_PORT_TLS>", :undefined, ssl_options: [ versions: [ :"tlsv1.2" ] ])
Handle error Error: Socket closed abruptly during opening handshake with Node.js
The error Error: Socket closed abruptly during opening handshake may occur when using a version of the Node.js amqplib library older than 0.10.7 while connecting to RabbitMQ 4.1.0 or later. This issue is related to a change in the frame_max setting introduced in RabbitMQ 4.1.0.
To resolve the error, update your amqplib library to version 0.10.7 or later.