 Node-RED: Getting started
How to get started with Node-RED
👋 Welcome to the Stackhero documentation!
Stackhero offers a ready-to-use Node-RED cloud solution that provides a host of benefits, including:
- MQTT server included (Mosquitto).
- Full access to Node-RED admin UI.
- Node-RED Dashboard included.
- Unlimited and dedicated SMTP email server included.
- Effortless updates with just a click.
- Customizable domain name secured with HTTPS (for example, https://node-red.your-company.com).
- Optimal performance and robust security powered by a private and dedicated VM.
Save time and simplify your life: it only takes 5 minutes to try Stackhero's Node-RED cloud hosting solution!
How to send email notifications
Each Node-RED instance on Stackhero comes with its own dedicated email server. This server lets you send unlimited email notifications with just a few clicks.
To begin sending emails from your Node-RED instance, add an "email" node to your flow. You will notice two email nodes in the nodes list. Choose the one with the mail icon on the right. Once added, the node will automatically be named "Stackhero integrated email server" and comes pre-configured.
Double-click the email node and enter your email address in the "To:" field. It is best to leave the rest of the settings unchanged.
Next, add an "inject" node to your flow and connect it to the email node. Double-click the inject node (named "timestamp" by default), select "string" as the payload type, and enter "This is an email from Node-RED" as the payload.
Review your node configurations, deploy your flow, and click the action icon on the inject node. Then check your email inbox to view the email sent from Node-RED!
Tip: You can send emails to multiple recipients by separating each email with a semi-colon in the "To:" field.
How to require Node.js native modules
In Node-RED functions, trying to require a Node.js native module directly results in the error ReferenceError: require is not defined. This is because Node-RED does not allow you to require a Node.js module directly inside a function.
To resolve this, these modules have been integrated into the Node-RED global context. You can access them using context.global.
For example, if you need the crypto module, declare it like this:
const { crypto } = context.global;
The following Node.js modules are available: util, buffer, child_process, crypto, fs, os, http, http2, https, and zlib.
Connecting to a MySQL or MariaDB database
We have developed a node to connect to a MySQL server that is fully compatible with MySQL 8's new authentication system, "Caching SHA2 Password", as well as with MariaDB.
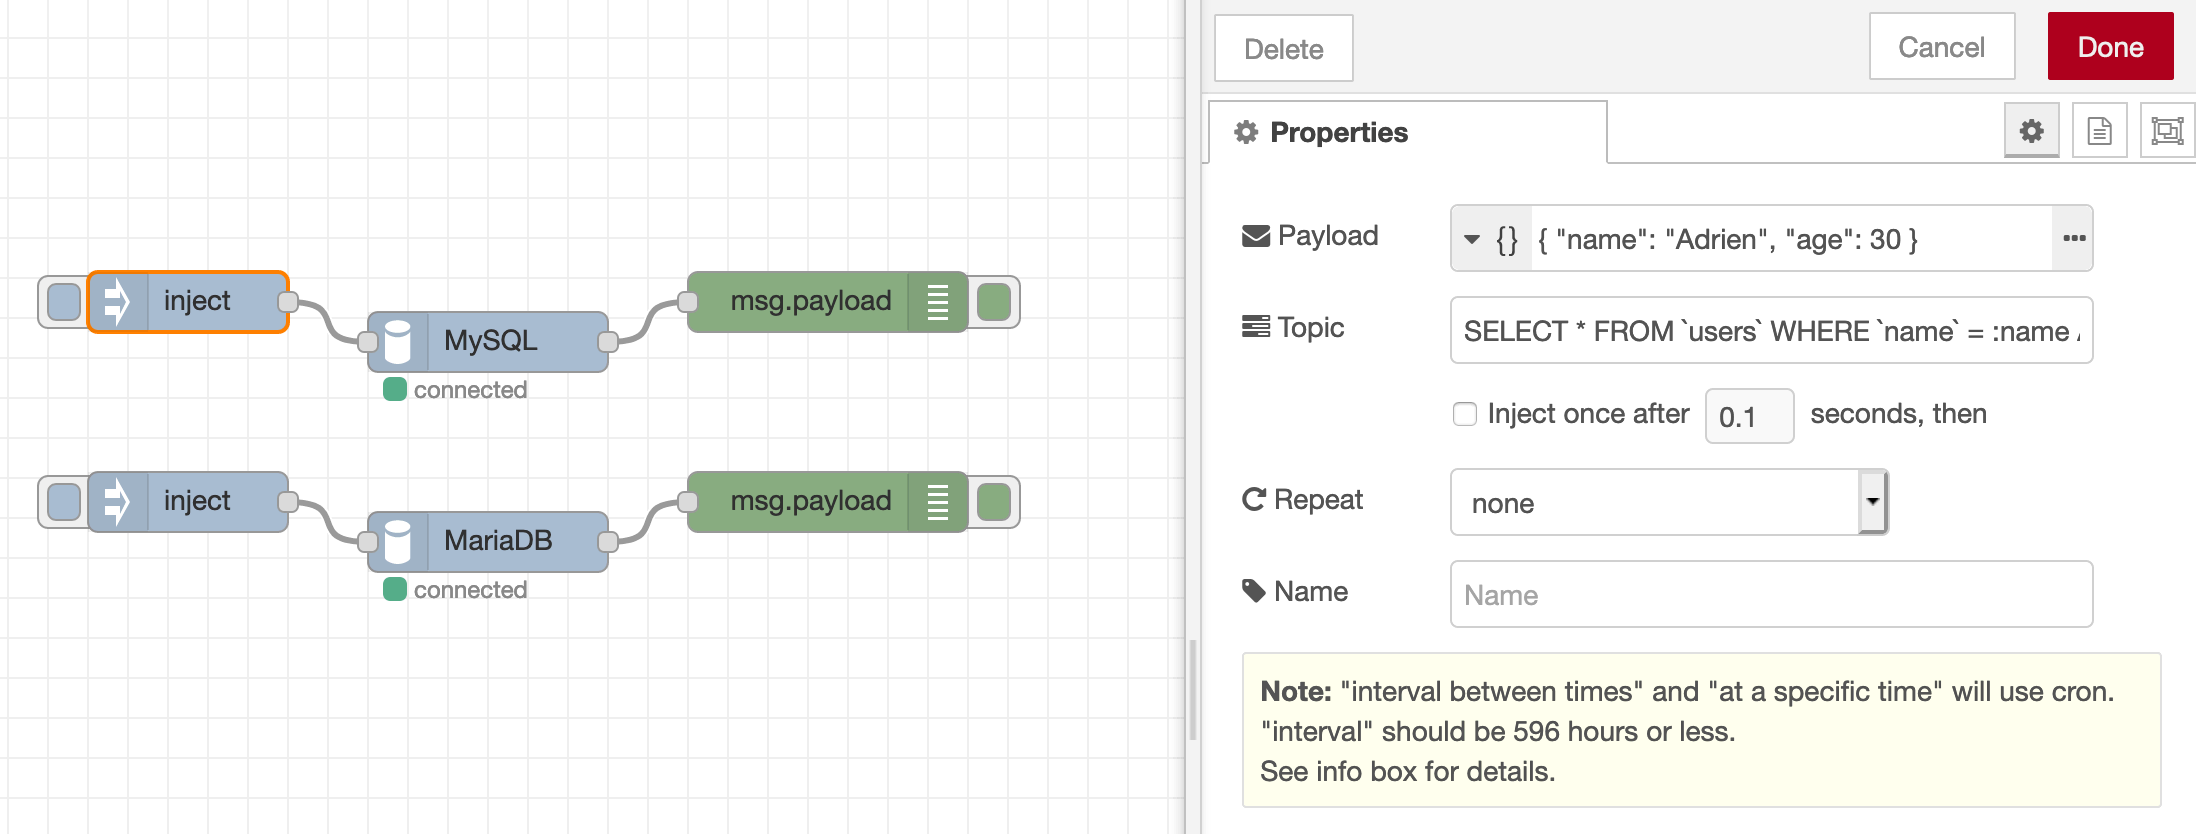 MySQL/MariaDB node
For more details, visit the official repository. To install this node on your Node-RED instance, simply search for stackhero in the Manage palette section of your Node-RED dashboard.
Connecting to an InfluxDB v2 database
We offer a node designed to connect to an InfluxDB v2 database. This node enables you to write data and perform queries using the Flux language.
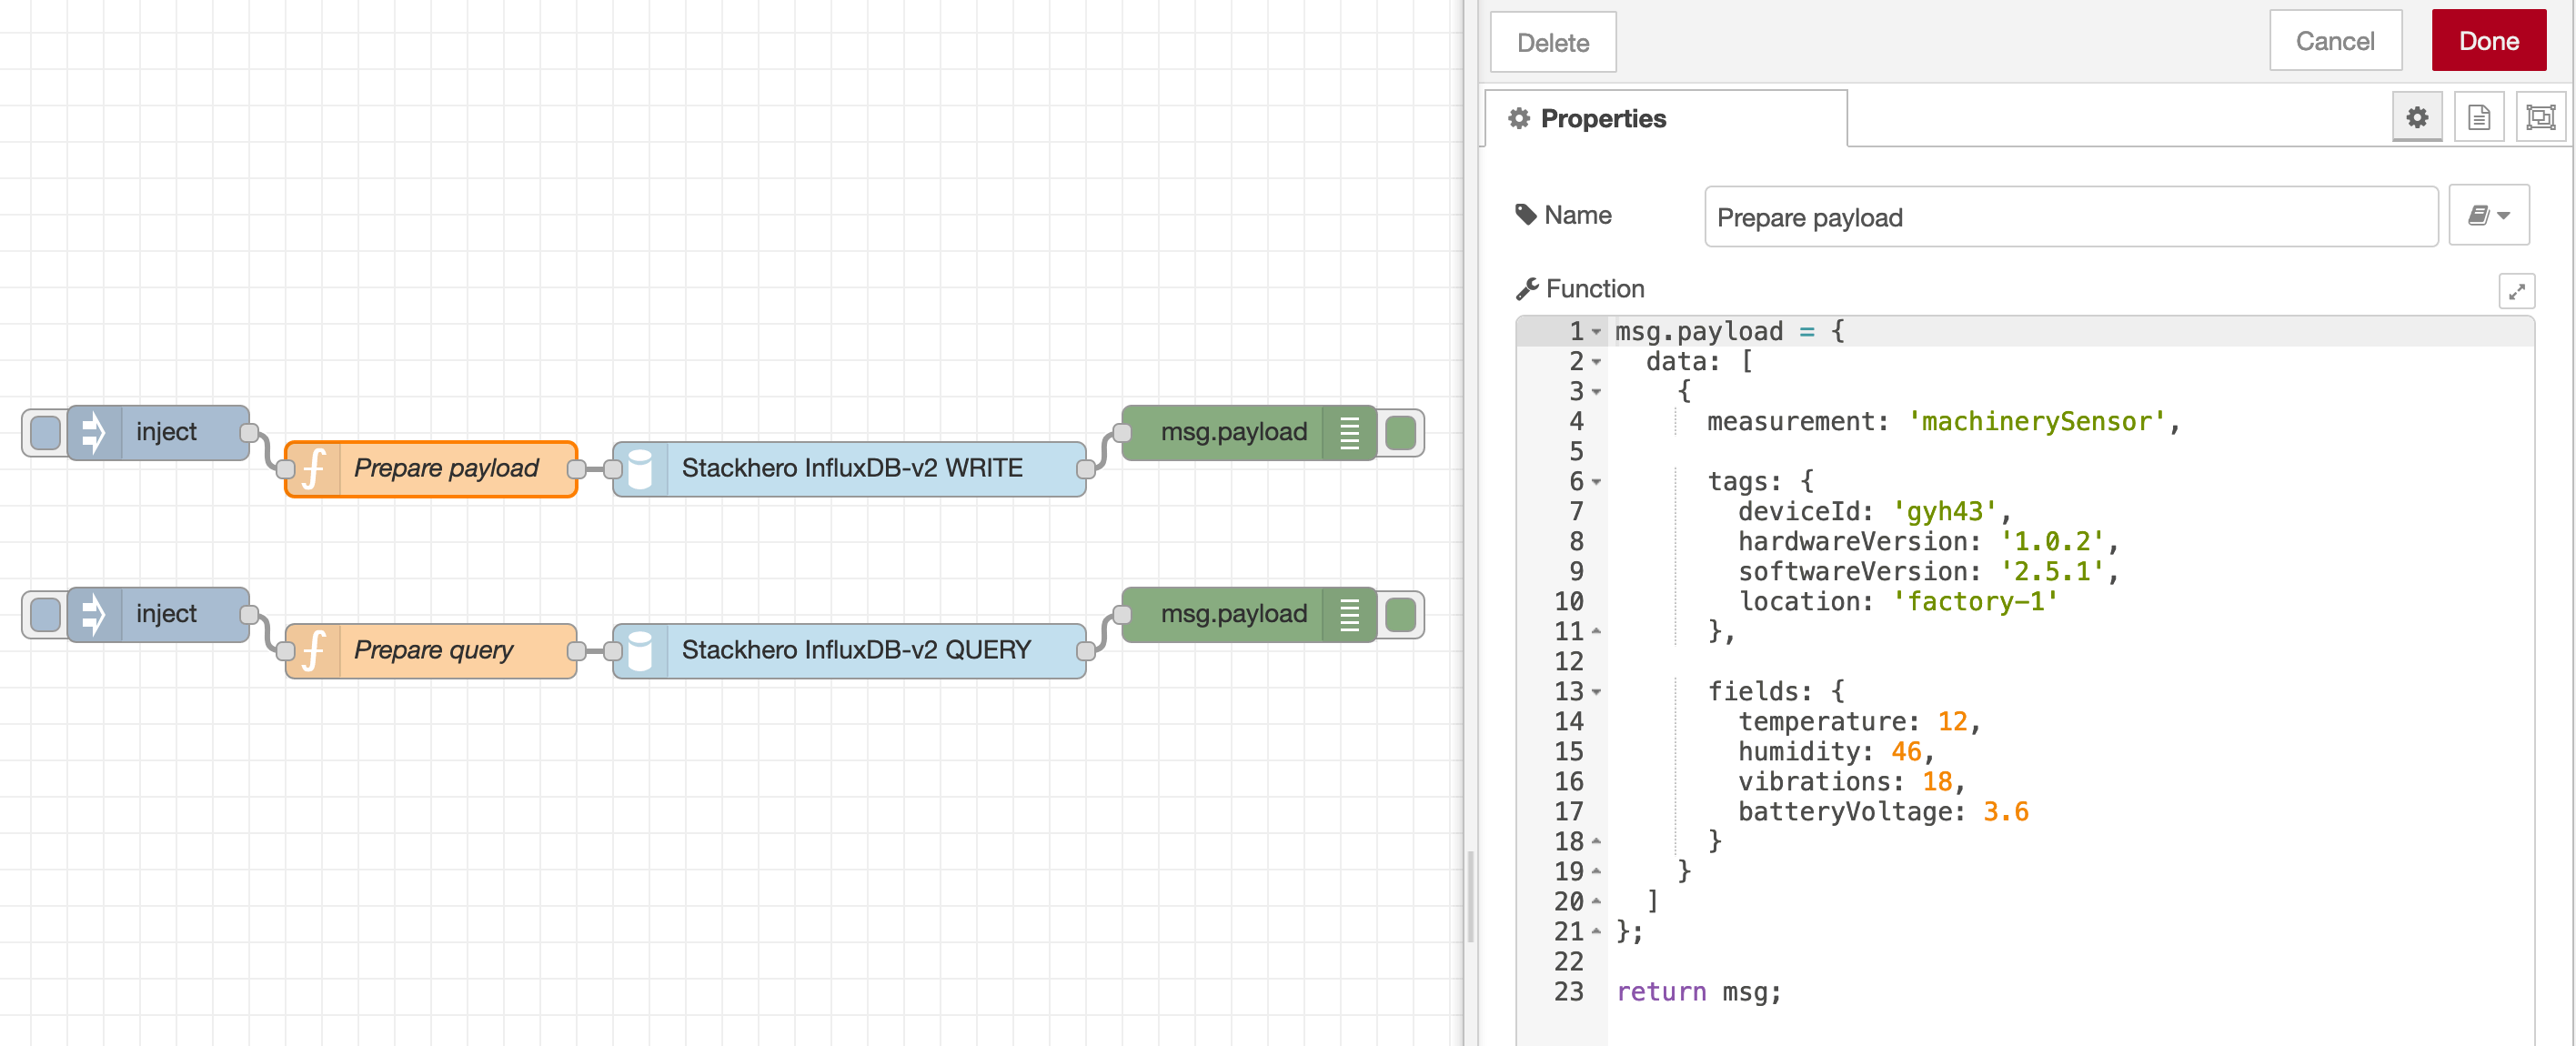 InfluxDb-v2 node
Additional information is available on the official repository. To add it to your Node-RED instance, search for stackhero in the Manage palette section.
How to catch and log errors from Node-RED nodes
At times, nodes may generate errors. A practical solution is to set up a "catch all debug" flow to monitor these errors.
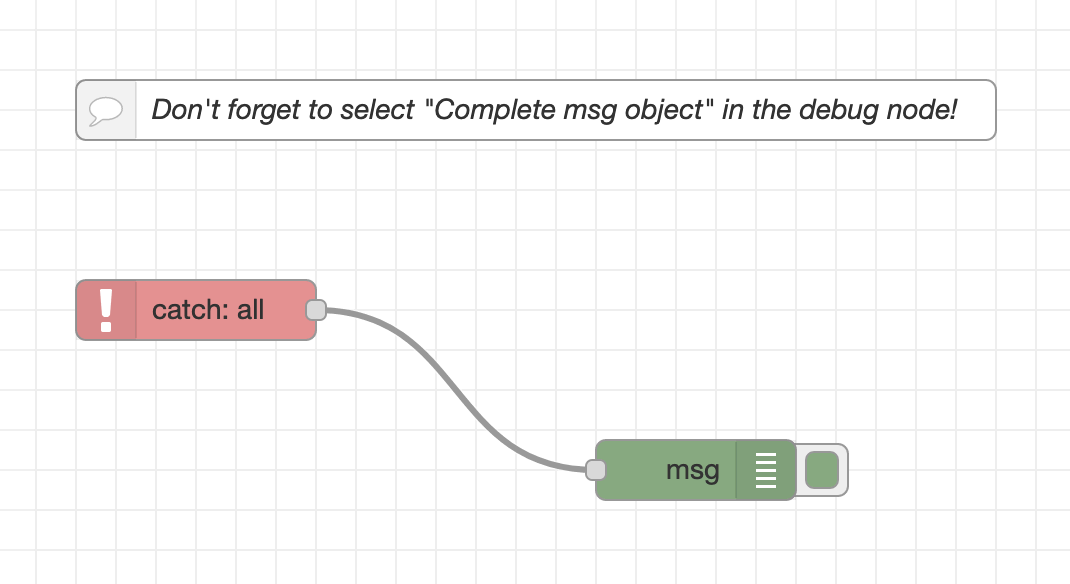 Example of a Node-RED error catch flow
To set this up, add a catch node and connect it to a debug node. Configure the debug node to output the complete msg object. This setup logs each error generated in the flow to the Node-RED debug window.
 Example of a Node-RED node error caught
A
catchnode is only triggered by errors from nodes within the same flow. If you use multiple flows (or tabs), you will need to add thecatchanddebugnodes to each flow.
Store data on the filesystem
Stackhero for Node-RED offers local storage where your nodes can store files. This storage is located in the /persistent/storage/ directory.
Never use another destination for your local storage than a subdirectory of
/persistent/storage/. If you use another directory, you will lose your data when you apply a Node-RED update!
Node configuration to store local data
In this example, we will use the node-red-node-sqlite node. This node requires a directory to store its data.
You will need to define a file in the directory /persistent/storage/, for example, /persistent/storage/myDatabase.sqlite.
 Example of SQLite configuration on Node-RED
Store files
If you need to store data locally, you can write files to the /persistent/storage/ directory. Some Node-RED data might already be present in this directory. To avoid conflicts, it is recommended to use subdirectories, for example, /persistent/storage/myFlowData, to store your files.
To create this directory using Node.js, run the following code in your node:
fs.mkdirSync('/persistent/storage/myFlowData', { recursive: true });
notice If you plan to store more than a few files, we recommend using an object storage server. Object storage servers make it easier to manage, share, and access files via an API, like with the S3 protocol. Consider the MinIO service available on Stackhero for this purpose, which gives you an S3 compatible object storage server in just 2 minutes.
Use an HTTP node with an iFrame
When using an iFrame to request content via an HTTP node, the default header X-Frame-Options: SAMEORIGIN might prevent the page from displaying. Starting with Node-RED version 1.2.2-0, you can override this default header.
To do so, set the header X-Frame-Options to null on your HTTP response node. For example:
msg.headers = { "X-Frame-Options": null };
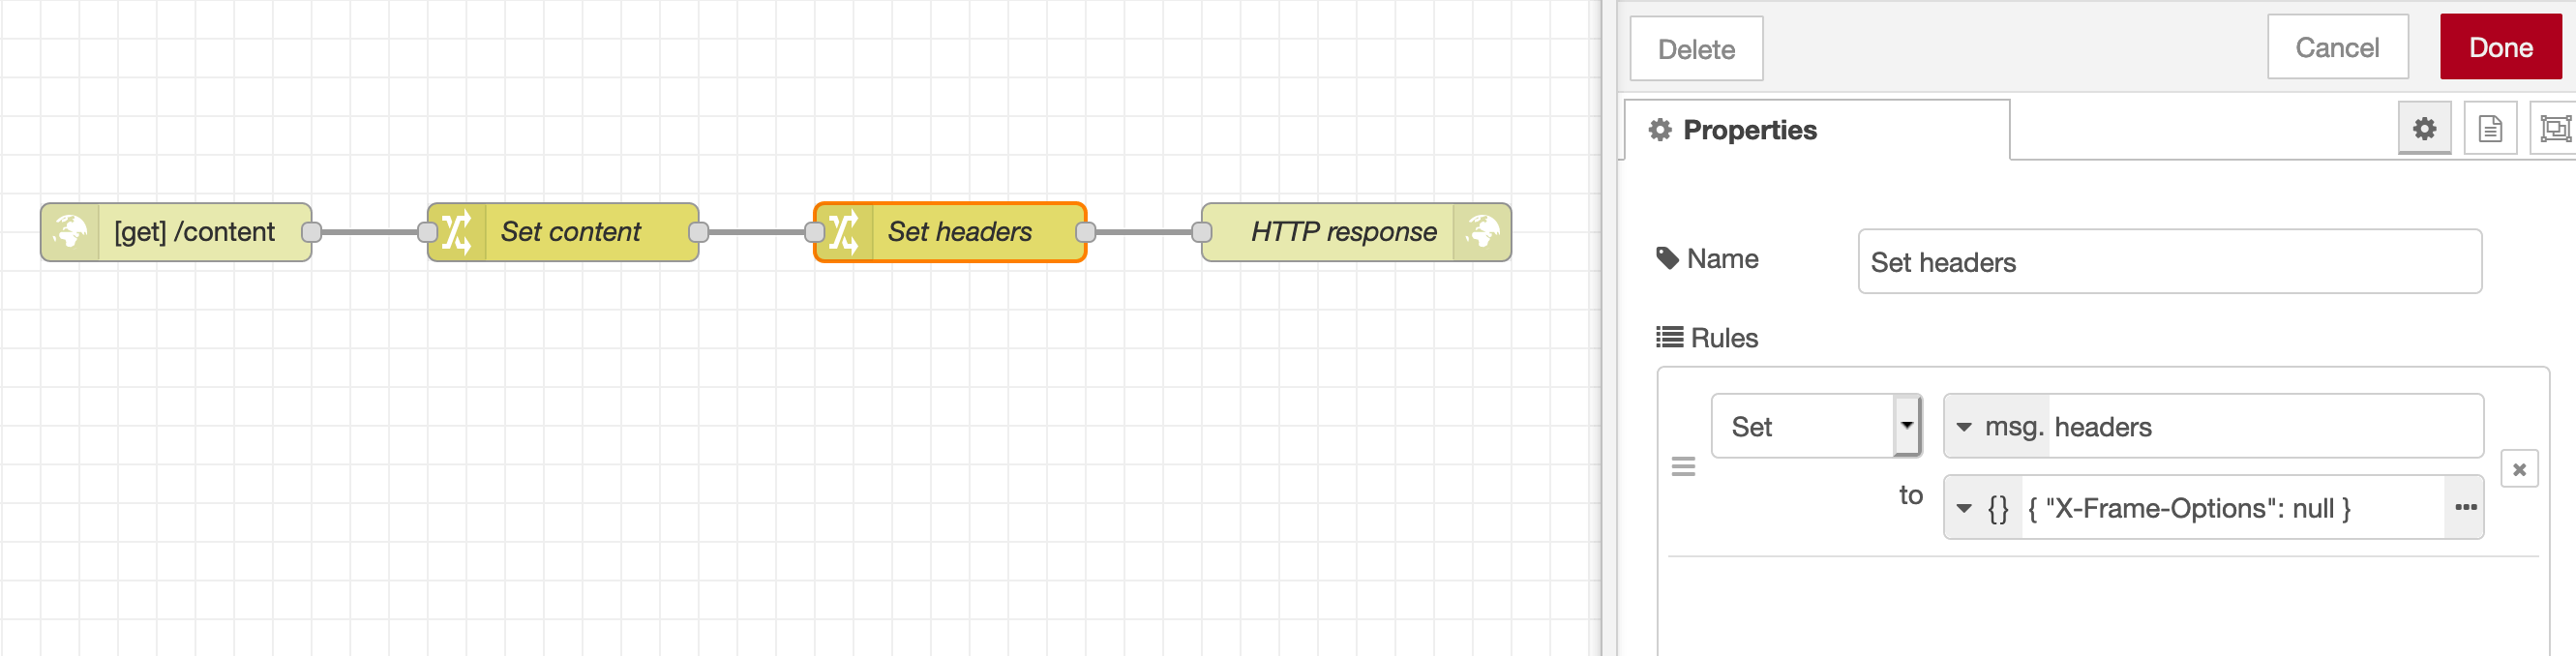 Example of a node setting the header X-Frame-Options
You can download this flow example and import it into your Node-RED instance to test the feature.
Note that you can also restrict allowed domains using the headers Content-Security-Policy: frame-ancestors <source> or X-Frame-Options: ALLOW-FROM <source>.
Safe mode: resolve Node-RED flows errors (502 error)
If you encounter a 502 error when accessing your admin dashboard, start by checking your instance logs. You can find these logs in the Stackhero dashboard under the "Logs" tab after selecting your Node-RED service.
The logs may contain Node-RED errors that prevent it from starting correctly. Collect as much information as possible to help debug your flows.
After reviewing your logs, go to your service configuration in the Stackhero dashboard and enable the "Safe mode" option. In safe mode, Node-RED will restart without automatically starting your flows.
This allows you to access the admin dashboard, fix your flow errors, and deploy your changes. Once everything is working smoothly, remember to disable safe mode in your service configuration so that your flows start automatically on Node-RED restart.
Node version in palette manager is older compared to the NPM one
If you try to install a node using the Palette Manager but notice that the version is older than the one on NPM, it likely means that the node's creator has not updated the version on the Node-RED website.
Previously, node versions were automatically updated to reflect the version published on NPM. This is no longer the case.
The good news is that you can prompt the Node-RED website to refresh the version. Simply go to https://flows.nodered.org/add/node, enter the NPM module name (for example, node-red-contrib-xxx), and click the "Add" button. Once completed, return to your Node-RED dashboard and open the Palette Manager. The updated version should now be visible and ready for installation.
Handle error "SSL routines:ssl3_get_record:wrong version number:../deps/openssl/openssl/ssl/record/ssl3_record.c"
If you see this error when sending an email, it is likely because you have selected the "Use secure connection" option in your email node configuration.
Since the Stackhero email server and the Node-RED server run on the same instance, they communicate locally, so you do not need to use TLS (SSL) encryption. Enabling the secure connection option causes Node-RED to use TLS to communicate with the email server, leading to the SSL error about a "wrong version number".
Please note that if the recipient server supports encryption, the email will be automatically encrypted with TLS. This has been pre-configured for you.